Showing posts with label Barefoot Bloggers. Show all posts

Thursday, December 2, 2010

Barefoot Bloggers - Lemon Chicken Breasts


My batting average for December is not very good so far.  After this recipe, I'm zero for two.  The Lemon Chicken Breasts were not a hit with me.  What should have been a flavorful dish, was just pretty bland.  Frankly there are a LOT better chicken recipes out there.  Sorry, Ina.

Here's hoping for a better tomorrow!!

Wednesday, September 1, 2010

Barefoot Bloggers - Mixed Berry Cheesecake


Barefoot Blogger recipes have been pretty much non existent this summer.  August had three options and this is the only one that I actually got around to baking.  I guess because it was the lesser of the three evils chosen this month.....fried chicken, ultimate grilled cheese or this cheesecake.  NO ONE in this house eats fried chicken and my ASSets don't need a grilled cheese sandwich that includes bacon!  The only reason the cheesecake made the cut was because I knew I could give it away.  BFF's hubby loooooves cheesecake.  My hubby, not so much.  And it's actually a dessert that I can resist.  Soooooo....


I don't have any idea how this tasted, because I didn't, but I do know how it looked and let's just say that the fruit on top was crucial.  This sucker had some huge craters.  Everywhere.  I followed Ina's baking instructions to the letter, but cheesecake without a water bath is gonna be cracked cheesecake.  Just no getting around it.  Well, in my experience anyway.  I've made Dorie's recipe probably five times and it comes out perfect.  Every.  Time.  Just sayin.

So while I can't recommend the backing process on this one, I was told it was delicious.

Here's the recipe if you want to try for yourself!

Mixed Berry Cheesecake
Ina Garten

Ingredients


For the crust:
1 1/2 cups graham cracker crumbs (10 crackers)
1 tablespoon sugar
6 tablespoons (3/4 stick) unsalted butter, melted

For the filling:
2 1/2 pounds cream cheese, at room temperature
1 1/2 cups sugar
5 whole extra-large eggs, at room temperature
2 extra-large egg yolks, at room temperature
1/4 cup sour cream
1 tablespoon grated lemon zest (2 lemons)
1 1/2 teaspoons pure vanilla extract

For the topping:
1 cup red jelly (not jam) such as currant, raspberry, or strawberry
1/2 pint sliced strawberries
1/2 pint fresh raspberries
1/2 pint fresh blueberries

Directions
Preheat the oven to 350 degrees F.

To make the crust, combine the graham crackers, sugar, and melted butter until moistened. Pour into a 9-inch springform pan. With your hands, press the crumbs into the bottom of the pan and about 1-inch up the sides. Bake for 8 minutes. Cool to room temperature.

Raise the oven temperature to 450 degrees F.

To make the filling, cream the cream cheese and sugar in the bowl of an electric mixer fitted with a paddle attachment on medium-high speed until light and fluffy, about 5 minutes. Reduce the speed of the mixer to medium and add the eggs and egg yolks, 2 at a time, mixing well. Scrape down the bowl and beater, as necessary. With the mixer on low, add the sour cream, lemon zest, and vanilla. Mix thoroughly and pour into the cooled crust.

Bake for 15 minutes. Turn the oven temperature down to 225 degrees and bake for another 1 hour and 15 minutes. Turn the oven off and open the door wide. The cake will not be completely set in the center. Allow the cake to sit in the oven with the door open for 30 minutes. Take the cake out of the oven and allow it to sit at room temperature for another 2 to 3 hours, until completely cooled. Wrap and refrigerate overnight.

Remove the cake from the springform pan by carefully running a hot knife around the outside of the cake. Leave the cake on the bottom of the springform pan for serving.

To make the topping, melt the jelly in a small pan over low heat. In a bowl, toss berries and the warm jelly gently until well mixed. Arrange the berries on top of the cake. Refrigerate until ready to serve.

Friday, July 30, 2010

Barefoot Bloggers - Greek Panzanella, Sour Cream Coffee Cake, and Scalloped Tomatoes


It's been almost two months since I've posted a Barefoot Bloggers recipe.  The leader of the group relaxed the rules a bit for the summer months and allowed us to post the recipes anytime during the month.   As usual I took my own special liberties with the rules and am posting June and July's recipes before the end of this month....which happens to be tomorrow, so just like TWD, you're getting your monies worth here today!!

We'll start with the Greek Panzanella, which I was sure we had already made, but looking back it was just Panzanella.....no Greek the last time.  It's basically the same recipe with some Greek touches thrown in.  Specifically olives, which I hate so I didn't add them, which makes me question if this is actually Greek now??  Anyhoo it was still good.  But it's got toasted bread cubes, so how could it not be good.  But it's only good for a few hours, then the bread starts to get all mushy, so this is one of those that needs to be eaten the day it's made.  No leftovers here.

Thanks to Tara of Smells Like Home for the pick.

Click here for the recipe.

++++++++++++++++++++++++++++++++++


Oh my this was really good.  Ina's Sour Cream Coffee Cake.  I've actually made this a couple of times in the past and it's a favorite.  It's perfect for breakfast with your coffee, an afternoon snack, or a late night indulgence.  I left out the nuts and doubled the streusel filling because that's the way I roll.

Thanks to Gwenn of Cooking in Pajamas for the selection.

Click here for the recipe.

++++++++++++++++++++++++++++++++++++++++


Initially I wasn't sure about this recipe because I'm not a huge fan of cooked chunks of tomato.  I love all of the ingredients....tomatoes, croutons, basil, garlic, and parmesan.....but just couldn't wrap my brain around baking them.  Well sometimes my brain misleads me.  

This was freaking amazing.  Hubs and I made an entire meal out of this (and some coffee cake!) but I'll be making this over and over as a side dish to go with just about anything.  The only thing I changed was adding some red pepper flakes to the bread cubes as I was toasting them.  Added a subtle little kick.  

This is super easy and comes together in about 15 minutes (plus the 30-40 minutes of baking time....but that's just enough time for that first glass of wine!!).  You absolutely must make this!!

Thanks to Josie of Pink Parsley (one of my favorite blogs) for hosting this pick.

Click here for the recipe.

Wednesday, June 9, 2010

TWD - Tender Shortcakes


When I read that The Tortefeasor had picked Dorie's Tender Shortcakes for this week it immediately conjured up thoughts of Summer.  I can remember going to the strawberry patch as a child and after we'd picked our berries and headed home I knew that we'd either have strawberry pie or strawberry shortcake for dessert that night.  My brother was the pie fan but I was definitely a shortcake girl.....even if they were from a box of Bisquick!!  Loved them.

Sorry Mom, but Dorie's version is a hint better than the box version!  These are light and flaky with just the right amount of sweetness.  I took the "playing around" suggestion and added 1/2 tsp of almond extract and thought it made a big difference, but I've mentioned before how I feel about almond extract!

Make these.  They're a perfect accompaniment to the fresh berries that are abundant this time of year and I can't wait to pair these with some fresh Alabama peaches in the next couple of weeks.  Yum!  Head over the Cathy's site for the recipe.  She's a fellow Birminghamian with a great blog!

Tuesday, June 1, 2010

TWD and BB Catch-up Day!


It's been pretty crazy around here for the past week.  All kinds of progress has been made in the pool house and we almost got everything finished in time for Memorial Day weekend.  I'll be posting the finished product later this week, but there was a minor punctured gas line snafu that needs to be fixed first.  Cross your fingers that it won't involve tearing out a stone wall.  Ugh.

This is what my driveway looked like most of last week while they were finishing up the landscaping.  Crazy busy, but it came out beautifully.


And while everything wasn't perfect, we were able to spend the weekend out there enjoying the pool, the pizza oven and the fabulous ambience that we've been looking forward to for over a year now!

And some beautiful sunsets!


And while I was too exhausted to actually post the recipes, I did find time to get them all made.

Let's start with last week's TWD selection...the Banana Coconut Ice Cream Pie that was chosen by Spike of Spike Bakes.  As you can see from the picture, this was a disaster for me.  The one good thing about this is the crust.  I'll definitely use this crust recipe for something else in the future, but it won't be for this ice cream.  Disregarding the fact that my ice cream mixture was the consistency of soup by the time I poured it back into the crust shell, we just didn't like the taste.   Oh well.


Next up was Ina's Grilled Herb Shrimp that was chosen by Penny of Lake Lure Cottage Kitchen.  This was really easy to throw together, but it was at the end of a long day outside and I didn't have the energy to make anything to go with it.  It didn't matter.  These were perfect all by themselves.  And just as good the next evening thrown into some quesadillas.  I could also see tossing these into some angel hair pasta for a light summer dinner.  Very versatile little suckers!!  Check out Penny's site for the recipe.  


And to bring me up to date, today's TWD is the White Chocolate Brownies chosen by Marthe of Culinary Delights.  (TWD is truly an international group....Marthe is from the Netherlands!!)  I kind of mutilated Dorie's original recipe here.  I DO NOT like meringue...at all!  So that wasn't going to happen.  And I was out of raspberries, so again....not happening.  I did have some white chocolate chips, so I threw those in instead.

These have more of a cakey texture than a brownie texture, but they were still pretty good.  I topped mine with some of Jeni's Splendid Goat Cheese and Roasted Red Cherries Ice cream and some fresh cherries.  If you want to see the finished product as it was intended, visit Marthe's site!


And if you'd like to cook along with us every week, pick up Dorie's book, Baking: From My Home to Yours.

Thursday, May 13, 2010

Barefoot Bloggers - Spring Green Risotto


I feel like the only recipes I've posted lately have been of the sweet variety so I was thrilled when this month's BB selections were announced and both were savory.  I was even more thrilled when one of them happened to be risotto.  Ina knows risotto.  This one might be my favorite.......slightly crunchy veggies, tangy lemon and creamy mascarpone.  Nom, nom, nom.
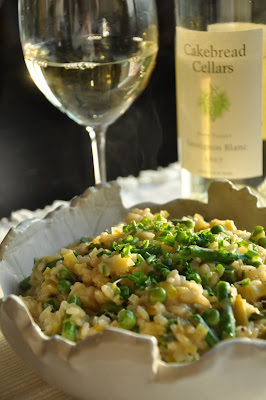

I get asked a lot about making risotto by people who seem to be really intimidated by it.  It's really not hard, but it does take a little bit of time and your full attention.  My best piece of advice for full proof risotto is good preparation.  Have all your ingredients chopped, measured and ready to go before you start cooking.  Actually this is good advice for all recipes, but it's really important for this.  If you've got what the professionals call mise en place, everything in its place, then you can devote all of your attention to the slow addition of the liquid and the stirring.  Which is how you get creamy risotto.  And happy eaters.

Thanks to Kimberly of Indulge and Enjoy for a perfect Spring choice.  Here's the recipe.


Spring Green Risotto
2008, Barefoot Contessa Back to Basics

Ingredients


1 1/2 tablespoons good olive oil
1 1/2 tablespoons unsalted butter
3 cups chopped leeks, white and light green parts (2 leeks)
1 cup chopped fennel
1 1/2 cups Arborio rice
2/3 cup dry white wine
4 to 5 cups simmering chicken stock, preferably homemade
1 pound thin asparagus
10 ounces frozen peas, defrosted, or 1 1/2 cups shelled fresh peas
1 tablespoon freshly grated lemon zest (2 lemons)
Kosher salt and freshly ground black pepper
2 tablespoons freshly squeezed lemon juice
1/3 cup mascarpone cheese, preferably Italian
1/2 cup freshly grated Parmesan, plus extra for serving
3 tablespoons minced fresh chives, plus extra for serving


Directions


Heat the olive oil and butter in a medium saucepan over medium heat. Add the leeks and fennel and saute for 5 to 7 minutes, until tender. Add the rice and stir for a minute to coat with the vegetables, oil, and butter. Add the white wine and simmer over low heat, stirring constantly, until most of the wine has been absorbed. Add the chicken stock, 2 ladles at a time, stirring almost constantly and waiting for the stock to be absorbed before adding more. This process should take 25 to 30 minutes.

Meanwhile, cut the asparagus diagonally in 1 1/2-inch lengths and discard the tough ends. Blanch in boiling salted water for 4 to 5 minutes, until al dente. Drain and cool immediately in ice water. (If using fresh peas, blanch them in boiling water for a few minutes until the starchiness is gone.)

When the risotto has been cooking for 15 minutes, drain the asparagus and add it to the risotto with the peas, lemon zest, 2 teaspoons salt, and 1 teaspoon pepper. Continue cooking and adding stock, stirring almost constantly, until the rice is tender but still firm.

Whisk the lemon juice and mascarpone together in a small bowl. When the risotto is done, turn off the heat and stir in the mascarpone mixture plus the Parmesan cheese and chives. Set aside, off the heat, for a few minutes, sprinkle with salt and pepper, and serve hot with a sprinkling of chives and more Parmesan cheese.

Tuesday, April 27, 2010

TWD and BB Combo!

My mother pleasantly reminded me the other day that "You haven't posted anything on your blog lately."  Thanks for calling me out for being the slacker that I am, Mom!  However, you are right.  (Just this time).

Things have been busy around here.  We're getting down to the nitty-gritty on "the shed" as Mr. B likes to call it.  He called it that in front of our architect the other day.  Luckily he's a cool guy.....he just said, "Have you even looked at any of the checks you've been writing for this "shed"?  So now he calls it the "big shed".


Anyhoo, we're almost finished.  We probably would be but the stone contractor can't keep up with the stone masons.  They're laying it faster than it can be trucked in.  These guys rock.  HAHA.  Get it?  Stone masons.  Ro.....never mind.  We should be done well before Memorial Day.  Partay!!!


So, while I haven't actually been posting anything on time, I have been completing the assignments!  And I have the crappy pictures to prove it.  See.....


Both of these pictures suck but the Thumbprints and the Swedish Visiting Cake were delicious.


Especially this cake.  This was actually the TWD from a couple of weeks ago that I didn't think we'd like so I didn't make it.  Big mistake.  This is so simple (one bowl and no heavy equipment) and r.e.a.l.l.y. GOOD.  Like slap-your-grandma good. Perfect for a little snack with your afternoon coffee or tea, or if your a wino like me, it goes great after dinner with a little glass of Sauterne or Vin Santo.  Makes my mouth water just thinking about it.

The BB selection, Jam Thumprint Cookies, was also really tasty but that dough gave me fits.  I don't know what was up, but I had a hell of a time keeping it together.  It just wanted to fall apart.  Especially after I refrigerated it.  So, while the cookies tasted great, they were a little too frustrating for me.

For the cake recipe, check out Nancy's site, The Dog Eats the Crumbs.  For this week's TWD, Chockablock Cookies, visit Mary at Popsicles and Sandy Feet.

Here's the recipe for the BB cookies:

Jam Thumbprint Cookies
Recipe courtesy Ina Garten, Barefoot Contessa Family Style

Ingredients


3/4 pound (3 sticks) unsalted butter, at room temperature
1 cup sugar
1 teaspoon pure vanilla extract
3 1/2 cups all-purpose flour
1/4 teaspoon kosher salt
1 egg beaten with 1 tablespoon water, for egg wash
7 ounces sweetened flaked coconut
Raspberry and/or apricot jam


Directions


Preheat the oven to 350 degrees F.

In an electric mixer fitted with the paddle attachment, cream together the butter and sugar until they are just combined and then add the vanilla. Separately, sift together the flour and salt. With the mixer on low speed, add the flour mixture to the creamed butter and sugar. Mix until the dough starts to come together. Dump on a floured board and roll together into a flat disk. Wrap in plastic and chill for 30 minutes.

Roll the dough into 1 1/4-inch balls. (If you have a scale they should each weigh 1 ounce.) Dip each ball into the egg wash and then roll it in coconut. Place the balls on an ungreased cookie sheet and press a light indentation into the top of each with your finger. Drop 1/4 teaspoon of jam into each indentation. Bake for 20 to 25 minutes, until the coconut is a golden brown. Cool and serve.

Monday, April 12, 2010

Barefoot Bloggers - Cappuccino Oatmeal and Cinnamon Oatmeal Cookies


Wow.  It was a whirlwind weekend here.  The 'rents blew in from Florida for mama 'rent's 70th birthday celebration and boy did we celebrate....parties at the house, out to dinner, the inaugural firing of the pizza oven.....so much shizzle to share.  Later.

But first, another late BB post.  I only have to post twice a month and I still can't get it done on time.  WTF?


Everyone in this family turns up their noses at the mere mention of a raisin so I knew I was going to have to change these up.  Since I'd just received a large package from King Arthur not to long ago that had some delunkshus cappuccino and cinnamon chips, I decided to go that route!  Great choice, if I do say so myself.

I doubled the recipe and added cappuccino chips to half and cinnamon chips to the other half.  These were a both a huge hit, but I personally liked the cappuccino ones the best.  I've also made these with butterscotch chips in the past and love those too, so these are a really versatile little cookie!  Oatmeal goes with everything, I guess!!

So try these out and put your own spin on them.  

Here's the recipe:

Raisin Pecan Oatmeal Cookies
Barefoot Contessa Back to Basics

Ingredients


1 1/2 cups pecans  (I eliminated these)
1/2 pound (2 sticks) unsalted butter, at room temperature
1 cup dark brown sugar, lightly packed
1 cup granulated sugar
2 extra-large eggs, at room temperature
2 teaspoons pure vanilla extract
1 1/2 cups all-purpose flour
1 teaspoon baking powder
1 teaspoon ground cinnamon
1 teaspoon kosher salt
3 cups old-fashioned oatmeal
1 1/2 cups raisins (I substituted)


Directions


Preheat the oven to 350 degrees F.

Place the pecans on a sheet pan and bake for 5 minutes, until crisp. Set aside to cool. Chop very coarsely.

In the bowl of an electric mixer fitted with the paddle attachment, beat the butter, brown sugar, and granulated sugar together on medium-high speed until light and fluffy. With the mixer on low, add the eggs, one at a time, and the vanilla.

Sift the flour, baking powder, cinnamon, and salt together into a medium bowl. With the mixer on low, slowly add the dry ingredients to the butter mixture. Add the oats, raisins, and pecans and mix just until combined.

Using a small ice-cream scoop or a tablespoon, drop 2-inch mounds of dough onto sheet pans lined with parchment paper. Flatten slightly with a damp hand. Bake for 12 to 15 minutes, until lightly browned. Transfer the cookies to a baking rack and cool completely.

Thursday, April 1, 2010

Barefoot Bloggers - Caesar Club Sandwich


Since I was behind on the first BB recipe this month, it only figures that I'd be behind on this one too, right??  I had it in my head that this was to be posted on the last Thursday of the month, which I thought was today, but ummm.....well that was last year.


Whatev.  On to the sandwich.  It was simply amazing.  I mean how could it not be.....roast chicken, bacon, sun-dried tomatoes, bacon, a creamy caesar dressing, bacon....did I mention bacon?


All of the ingredients really come together in this to form the perfect sandwich.  Hubs doesn't like sun-dried tomatoes, so I left them off his side, and I feel like he was deprived of a critical part.  Sucks for him.

Thanks to Karen of Shortbread for hosting and my apologies for not paying closer attention to the calendar!

Here's the recipe:

Caesar Club Sandwich
2006, Barefoot Contessa at Home

Ingredients:


2 split (1 whole) chicken breasts, bone in, skin on
Good olive oil
Kosher salt
Freshly ground black pepper
4 ounces thinly sliced pancetta
1 large garlic clove, chopped
2 tablespoons chopped fresh flat-leaf parsley
1 1/2 teaspoons anchovy paste
1 teaspoons Dijon mustard
1 1/2 tablespoons freshly squeezed lemon juice
1/2 cup good mayonnaise
1 large ciabatta bread
2 ounces baby arugula, washed and spun dry
12 sun-dried tomatoes, in oil
2 to 3 ounces Parmesan, shaved


Directions:


Preheat the oven to 350 degrees F.

Place the chicken breasts on a sheet pan skin side up. Rub the chicken with olive oil and sprinkle with salt and pepper. Roast for 35 to 40 minutes, until cooked through. Cool slightly, discard the skin and bones, and slice the meat thickly. Set aside.

Meanwhile, place the pancetta on another sheet pan in a single layer. Roast for 10 to 15 minutes, until crisp. Set aside to drain on paper towels.

Place the garlic and parsley in the bowl of a food processor fitted with a steel blade and process until minced. Add the anchovy paste, mustard, lemon juice, and mayonnaise and process again to make a smooth dressing. (Refrigerate the Caesar dressing if not using it immediately.)

Slice the ciabatta in half horizontally and separate the top from the bottom. Toast the bread in the oven, cut side up, for 5 to 7 minutes; cool slightly. Spread the cut sides of each piece with the Caesar dressing. Place half the arugula on the bottom piece of bread and then layer in order: the sun-dried tomatoes, shaved Parmesan, crispy pancetta, and sliced chicken. Sprinkle with salt and pepper and finish with another layer of arugula. Place the top slice of ciabatta on top and cut in thirds crosswise. Serve at room temperature.

Saturday, March 13, 2010

Barefoot Bloggers - Baked Shrimp Scampi

I know that this week was supposed to be the Individual Meat Loaves and I made them.....just not exactly Ina's version. More on that another day! On to the Scampi.


Just one little thing to get off my chest about this recipe.....12 tablespoons of butter? Seriously, Ina? For six servings? Did you do that math on that? Jeesh!

Obviously I cut back on the butter. I only used three tablespoons and a tablespoon of olive oil. It was plenty and the dish came out delicious. I was also lazy on the shrimp and purchased peeled and deveined so there were no tails on mine! I served this as an appetizer to Hubs to enjoy with his wine the other night while he watched me make dinner! It keeps him out of trouble when I do that.

Thanks to Jill (great name!) of Insanely Good Food for this pick. It's easy and scrumptious and I know I'll be making it again and again!

Here's the recipe:

Baked Shrimp Scampi
Barefoot Contessa
Serves 6


Ingredients:

2 pounds (12 to 15 per pound) shrimp in the shell
3 tablespoons good olive oil
2 tablespoons dry white wine
Kosher salt and freshly ground black pepper
12 tablespoons (1 1/2 sticks) unsalted butter, at room temperature (I used three tbsp of butter and 1 tbsp olive oil)
4 teaspoons minced garlic (4 cloves)
1/4 cup minced shallots
3 tablespoons minced fresh parsley leaves
1 teaspoon minced fresh rosemary leaves
1/4 teaspoon crushed red pepper flakes
1 teaspoon grated lemon zest
2 tablespoons freshly squeezed lemon juice
1 extra-large egg yolk
2/3 cup panko (Japanese dried bread flakes) (I used whole wheat panko)
Lemon wedges, for serving

Directions:

Preheat the oven to 425 degrees F.

Peel, devein, and butterfly the shrimp, leaving the tails on. Place the shrimp in a mixing bowl and toss gently with the olive oil, wine, 2 teaspoons salt, and 1 teaspoon pepper. Allow to sit at room temperature while you make the butter and garlic mixture.

In a small bowl, mash the softened butter with the garlic, shallots, parsley, rosemary, red pepper flakes, lemon zest, lemon juice, egg yolk, panko, 1/2 teaspoon salt, and 1/4 teaspoon of pepper until combined.

Starting from the outer edge of a 14-inch oval gratin dish, arrange the shrimp in a single layer cut side down with the tails curling up and towards the center of the dish.

Pour the remaining marinade over the shrimp. Spread the butter mixture evenly over the shrimp. Bake for 10 to 12 minutes until hot and bubbly. If you like the top browned, place under a broiler for 1 minute. Serve with lemon wedges.

Sunday, February 14, 2010

Happy Valentines Day said with BB Coconut Cupcakes

First and foremost, Happy Valentines Day to my Valentine!

I said "I love you, man" with Ina's Coconut Cupcakes. He said "I love you, woman" by eating two large and three mini's as fast as I could frost them.


Here's where I show my amazing prowess in the kitchen by admitting that the "coconut" part of the cupcakes was, well, lacking you might say. I, genius baker, forgot to put the coconut in the batter. I didn't realize this until I had filled 12 regular size and 10 kabillion mini size cups with the batter and thought, "what the hell makes these coconut......just the frosting?" So I re-read the ingredient list again and oopsy......was supposed to fold 14 oz of coconut into the batter before filling cups. Too late.

I can't imagine how decadent these are made correctly because they're freaking amazing screwed up! It's just a great basic batter. Personally, I think the addition of the almond extract in both the batter and the frosting is why I love them so much. Such great flavor.

And if you happen to be in the Birmingham area and would like to try one, I have them coming out my ears. Halve the recipe unless you have an army to feed. I hope my skinny tennis team likes coconut!!

Here's the recipe:

Coconut Cupcakes
1999, The Barefoot Contessa Cookbook, All rights reserved

Ingredients:

3/4 pound (3 sticks) unsalted butter, room temperature
2 cups sugar
5 extra-large eggs at room temperature
1 1/2 teaspoons pure vanilla extract
1 1/2 teaspoons pure almond extract
3 cups flour
1 teaspoon baking powder
1/2 teaspoon baking soda
1/2 teaspoon kosher salt
1 cup buttermilk
14 ounces sweetened, shredded coconut


For the frosting:

1 pound cream cheese at room temperature
3/4 pound (3 sticks) unsalted butter, room temperature
1 teaspoon pure vanilla extract
1/2 teaspoon pure almond extract
1 1/2 pounds confectioners' sugar, sifted


Directions:

Preheat the oven to 325 degrees F.

In the bowl of an electric mixer fitted with the paddle attachment, cream the butter and sugar on high speed until light and fluffy, about 5 minutes. With the mixer on low speed, add the eggs, 1 at a time, scraping down the bowl after each addition. Add the vanilla and almond extracts and mix well.

In a separate bowl, sift together the flour, baking powder, baking soda, and salt. In 3 parts, alternately add the dry ingredients and the buttermilk to the batter, beginning and ending with the dry. Mix until just combined. Fold in 7 ounces of coconut.

Line a muffin pan with paper liners. Fill each liner to the top with batter. Bake for 25 to 35 minutes, until the tops are brown and a toothpick comes out clean. Allow to cool in the pan for 15 minutes. Remove to a baking rack and cool completely.

Meanwhile, make the frosting. In the bowl of an electric mixer fitted with the paddle attachment, on low speed, cream together the cream cheese, butter, and vanilla and almond extracts. Add the confectioners' sugar and mix until smooth.

Frost the cupcakes and sprinkle with the remaining coconut.

Thanks to Jamie of Jamie's Green Kitchen for this week's pick. Fabulous!!

Thursday, January 28, 2010

Barefoot Bloggers - Shrimp Bisque


I seriously considered not posting that picture. I mean, does that look appetizing to you? A bowl of brown, lumpy, well.....I won't go there. But then I went to the Food Network site to get a copy the recipe and saw their picture. Not any better. I figured this was just one of those times when you scratch your head and say, "How could something that tasted that GOOD, look so bad???"

And, wow, did this taste good. So good, that I didn't even mind the partially pureed texture. The only thing I'll do differently next time is roast a few extra shrimp for a topping....just so when I serve it at my next dinner party, people will know exactly what they're eating. And won't immediately push it away because its so damn ugly.

Thanks to Jennifer of Our Blessed Home for this week's BB pick. Great choice. I'm looking forward to reading everyone's posts this week and especially seeing their pictures!!

Here's the recipe:


Shrimp Bisque
2006, Barefoot Contessa at Home, All Rights Reserved

Ingredients

1 pound large shrimp, peeled and deveined, shells reserved
4 cups seafood stock
3 tablespoons good olive oil
2 cups chopped leeks, white and light green parts (3 leeks)
1 tablespoon chopped garlic (3 cloves)
Pinch cayenne pepper
1/4 cup Cognac or brandy
1/4 cup dry sherry
4 tablespoons (1/2 stick) unsalted butter
1/4 cup all-purpose flour
2 cups half-and-half
1/3 cup tomato paste
2 teaspoons kosher salt
1 teaspoon freshly ground black pepper


Directions

Place the shrimp shells and seafood stock in a saucepan and simmer for 15 minutes. Strain and reserve the stock. Add enough water to make 3 3/4 cups.

Meanwhile, heat the olive oil in a large pot or Dutch oven. Add the leeks and cook them for 10 minutes over medium-low heat, or until the leeks are tender but not browned. Add the garlic and cook 1 more minute. Add the cayenne pepper and shrimp and cook over medium to low heat for 3 minutes, stirring occasionally. Add the Cognac and cook for 1 minute, then the sherry and cook for 3 minutes longer. Transfer the shrimp and leeks to a food processor fitted with a steel blade and process until coarsely pureed.

In the same pot, melt the butter. Add the flour and cook over medium-low heat for 1 minute, stirring with a wooden spoon. Add the half-and-half and cook, stirring with a whisk, until thickened, about 3 minutes. Stir in the pureed shrimp, the stock, tomato paste, salt, and pepper and heat gently until hot but not boiling. Season, to taste, and serve hot.

Thursday, January 14, 2010

Barefoot Bloggers - Indonesian Ginger Chicken

It seems like forever since I've done a Barefoot Bloggers recipe. I think the last one was the Stuffed Mushrooms (yum!) which I guess was only a couple of weeks ago, but it seems longer. Oh well.

When I saw that the first pick for the new year was Indonesian Ginger Chicken, I wasn't all that excited. Asian food, other than sushi, never sounds good to me. The thought of sweet and savory together usually doesn't appeal. I like my sweets and savories to each occupy their own little spaces. Separate but equal. No mixing.


And this recipe called for a LOT of sweet....an entire cup of honey. Eeek. I knew right away I'd be doing a little tweeking on this recipe. First of all, I don't like cutting up whole chickens, so I usually just by whole breasts and whole legs and call it a day. Which is what I did here. I halved the recipe and just used two breasts and two legs. Plenty for Mr. B and myself, with a little leftover. We like leftover. I also halved the amount of honey (1/4 cup). Sorry Ina, you like things a little sweet for me.

This was delicious! I have to confess and say I didn't give this the respect it deserved in the end. I put the chicken in the fridge to marinate on Tuesday morning and on Wednesday afternoon an impromptu Girl's Night Out materialized (who misses those??) which meant Mr. B was gonna have to fend for himself for dinner. I put the chicken in the oven and left him the baking instructions and flew out the door! Hey, margaritas were waiting. Don't judge.

I came home to perfectly cooked chicken. That man rocks. But.....that's all he had. Just chicken. No sides. And this would really shine with some perfect sides.....mashed potatoes, roasted broccoli.....I don't know, but it deserves some accompaniment.

This was easy and really, really GOOD. If you're like me and have sweet/savory issues, ignore yourself and make this. I can't wait to see what the other bloggers did with this. Thanks to Todd at A Cooking Dad for a great choice to start the new decade!

Here's the recipe:


Indonesian Ginger Chicken
Copyright, 1999, The Barefoot Contessa Cookbook

Ingredients

1 cup honey
3/4 cup soy sauce
1/4 cup minced garlic (8 to 12 cloves)
1/2 cup peeled and grated fresh ginger root
2 (3 1/2 pound) chickens, quartered, with backs removed


Directions

Cook the honey, soy sauce, garlic, and ginger root in a small saucepan over low heat until the honey is melted. Arrange the chicken in 1 layer in a shallow baking pan, skin side down, and pour on the sauce. Cover the pan tightly with aluminum foil. Marinate overnight in the refrigerator.

Preheat the oven to 350 degrees F.

Place the baking pan in the oven and bake for 30 minutes. Uncover the pan, turn the chicken skin side up, and raise the temperature to 375 degrees F. Continue baking for 30 minutes or until the juices run clear when you cut between a leg and thigh and the sauce is a rich, dark brown.

Sunday, December 27, 2009

Barefoot Bloggers - Sausage Stuffed Mushrooms

I hope everyone had a fabulous Christmas! Mine is about to begin. I'm on my way to South Beach (literally.....I'm typing this in the car and we're just South of Orando!!) for a week of fun in the sun with the 'rents and the nieces and nephew. I'm sure there will be no alcohol involved and that I won't come home wishing I was checking into Betty Ford immediately! This group knows how to have a good time. I'm going to try to remember that I'm not their age anymore and that I canNOT keep up with them! We'll see how that goes.

I haven't participated in too many Barefoot Bloggers in the past couple of months, but when I saw Michelle of Welcome to the Club had chosen Ina's Sausage Stuffed Mushrooms I was thrilled. Who isn't looking for a fabulous appetizer this time of year? No one!


I made these one night when it was just the hubs and I at home (if you aren't aware we've had a couple of squatters living with us recently but they'll be gone the first of the year. I might actually miss them. Maybe). It ended up being the only thing he got for dinner! We opened a bottle of wine and thoroughly enjoyed these. As with all of Ina's recipes, this makes a TON. I had 15 mushrooms (she calls for 16, so close enough) and only used half of the filling. I froze the rest of it and think it will be fabulous just tossed into some pasta. I'll let you know.


You start by browning your sausage. The recipe calls for sweet sausage, but I say why use sweet when spicy is soooooo much better. But that's just me. Feel free to use sweet if you're not feeling so frisky.

Ummm...back up a moment here. I forgot to tell you to remove the stems from your shrooms and chop up the stems. Throw the caps into the oil and marsala and let sit until your ready to stuff.

Okay...back to the sausage. Toss in those stems that you just chopped and sautee those until they're soft.


Add the scallions and garlic. At this point you're going to want to shove your face into the skillet (don't. it's hot.) because it smells like h.e.a.v.e.n.


Add the panko. I never would have thought of adding panko but these make for an amazing texture.


Toss in the mascarpone. Ina calls says "preferably Italian" which threw me. Isn't mascarpone inherently Italian?? Doesn't matter. I didn't have any. I used cream cheese....preferably American.

This is where things get really gooooood. Stir that until all that creamy goodness melts together then pull it off the heat.


Add the parsley and the parmesan and season to taste with S&P.


Put your marinated mushroom caps into a pan that they fit nice and snug into. They each need to have their own place in the world but not be able to move around much.

Stuff those suckers with that delunkshus sausage mixture while periodically taking a bite for yourself. Hopefully you'll have enough left for all the shrooms.


Then bake them for about 50 minutes and serve.


These are definitely going into the app rotation. Try these.

Here's the recipe:


Sausage-Stuffed Mushrooms

Ingredients:

16 extra-large white mushrooms
5 tablespoons good olive oil, divided
2 1/2 tablespoons Marsala wine or medium sherry
3/4 pound sweet Italian sausage, removed from the casings
6 scallions, white and green parts, minced
2 garlic cloves minced
2/3 cup panko crumbs
5 ounces mascarpone cheese, preferably from Italy
1/3 cup freshly grated Parmesan
2 1/2 tablespoons minced fresh parsley leaves
Salt and freshly ground black pepper


Directions:
Preheat the oven to 325 degrees F.

Remove the stems from the mushrooms and chop them finely. Set aside. Place the mushroom caps in a shallow bowl and toss with 3 tablespoons of the olive oil and Marsala. Set aside.

Heat the remaining 2 tablespoons olive oil in a medium skillet over medium heat. Add the sausage, crumbling it with the back of a wooden spoon. Cook the sausage for 8 to 10 minutes, stirring frequently, until it's completely browned. Add the chopped mushroom stems and cook for 3 more minutes. Stir in the scallions and garlic and cook for another 2 to 3 minutes, stirring occasionally. Add the panko crumbs, stirring to combine evenly with all the other ingredients. Finally, swirl in the mascarpone and continue cooking until the mascarpone has melted and made the sausage mixture creamy. Off the heat, stir in the Parmesan, parsley, and season with salt and pepper, to taste, Cool slightly.

Fill each mushroom generously with the sausage mixture. Arrange the mushrooms in a baking dish large enough to hold all the mushrooms in a snug single layer. Bake until the stuffing for 50 minutes, until the stuffing is browned and crusty.

Sunday, December 6, 2009

Barefoot Bloggers - Company Pot Roast

We woke up to a little of the white stuff yesterday morning.


It's not something that happens often in Alabama and it never sticks around for long.


So you have to get out early if you want to enjoy it. The only thing I enjoy about it is that it's gone by noon.


I grew up with snow, so I'm not near as enamored by it as the native Southerners seem to be.

It did, however, seem to be a great day for some comfort food. Last month's selection of Ina's Company Pot Roast fit the bill.


This is really delicious.....a little labor intensive, but totally worth it. You puree half of the sauce which leaves a great combination of a smooth sauce with nice chunks of vegetables.

Try this one!


Company Pot Roast
2008, Barefoot Contessa Back to Basics, All Rights Reserved

Ingredients:

1 (4 to 5-pound) prime boneless beef chuck roast, tied
Kosher salt and freshly ground black pepper
All-purpose flour
Good olive oil
2 cups chopped carrots (4 carrots)
2 cups chopped yellow onions (2 onions)
2 cups chopped celery (4 stalks)
2 cups chopped leeks, white and light green parts (2 to 4 leeks)
5 large garlic cloves, peeled and crushed
2 cups good red wine, such as Burgundy
2 tablespoons Cognac or brandy
1 (28-ounce) can whole plum tomatoes in puree
1 cup chicken stock, preferably homemade
1 chicken bouillon cube
3 branches fresh thyme
2 branches fresh rosemary
1 tablespoon unsalted butter, at room temperature


Directions:
Preheat the oven to 325 degrees F.

Pat the beef dry with a paper towel. Season the roast all over with 1 tablespoon salt and 1 1/2 teaspoons pepper. Dredge the whole roast in flour, including the ends. In a large Dutch oven, heat 2 tablespoons olive oil over medium heat. Add the roast and sear for 4 to 5 minutes, until nicely browned. Turn and sear the other side and then turn and sear the ends. This should take 4 to 5 minutes for each side. Remove the roast to a large plate.

Add 2 tablespoons olive oil to the Dutch oven. Add the carrots, onions, celery, leeks, garlic, 1 tablespoon salt, and 1 1/2 teaspoons pepper and cook over medium heat for 10 to 15 minutes, stirring occasionally, until tender but not browned. Add the wine and Cognac and bring to a boil. Add the tomatoes, chicken stock, bouillon cube, 2 teaspoons salt, and 1 teaspoon pepper. Tie the thyme and rosemary together with kitchen string and add to the pot. Put the roast back into the pot, bring to a boil, and cover. Place in the oven for 2 1/2 hours, until the meat is fork tender or about 160 degrees F internally. Turn the heat down to 250 degrees F after about an hour to keep the sauce at a simmer.

Remove the roast to a cutting board. Remove the herb bundle and discard. Skim off as much fat as possible from the sauce. Transfer half the sauce and vegetables to a blender or a food processor fitted with the steel blade and puree until smooth. Pour the puree back into the pot, place on the stovetop over low heat, and return the sauce to a simmer. Place 2 tablespoons flour and the butter in a small bowl and mash them together with a fork. Stir into the sauce and simmer for 2 minutes, stirring until thickened. Taste for seasonings. Remove the strings from the roast, and slice the meat. Serve warm with the sauce spooned over it.

Monday, November 23, 2009

Barefoot Bloggers - Peanut Butter and Jelly Bars

I know. It's been a long time since there has been anything on this blog about food. The last food post was this one where I promised that I was going to make Ina's Peanut Butter and Jelly Bars.

And I did. And they were good......really good. And you should make them too!


I mean, really, is there anything better than peanut butter and jelly? Doesn't it immediately conjure up memories of your childhood? It does for me.

This is just a great little bar that I think actually got better on the second and third day. I liked them fresh out of the oven, but I loved them a few days later. They seemed a little more moist and the flavors just a little more blended.

As with most Ina recipe, this makes a ton of bars. A full sheet pan. Next time I'll halve it.


Peanut Butter and Jelly Bars
Barefoot Contessa

Ingredients:

1/2 pound (2 sticks) unsalted butter, at room temperature
1 1/2 cups sugar
1 teaspoon pure vanilla extract
2 extra-large eggs, at room temperature
2 cups (18 ounces) creamy peanut butter (recommended: Skippy)
3 cups all-purpose flour
1 teaspoon baking powder
1 1/2 teaspoons kosher salt
1 1/2 cups (18 ounces) raspberry jam or other jam
2/3 cups salted peanuts, coarsely chopped

Directions:

Preheat the oven to 350 degrees F.

Grease a 9 by 13 by 2-inch cake pan. Line it with parchment paper, then grease and flour the pan.

In the bowl of an electric mixer fitted with the paddle attachment, cream the butter and sugar on medium speed until light yellow, about 2 minutes. With the mixer on low speed, add the vanilla, eggs, and peanut butter and mix until all ingredients are combined.

In a small bowl, sift together the flour, baking powder, and salt. With the mixer on low speed, slowly add the flour mixture to the peanut butter mixture. Mix just until combined.

Spread 2/3 of the dough into the prepared cake pan and spread over the bottom with a knife or offset spatula. Spread the jam evenly over the dough. Drop small globs of the remaining dough evenly over the jam. Don't worry if all the jam isn't covered; it will spread in the oven. Sprinkle with chopped peanuts and bake for 45 minutes, until golden brown. Cool and cut into squares.

Sunday, November 8, 2009

Barefoot Bloggers - Caramelized Butternut Squash

I don't know if this is technically a Barefoot Bloggers choice. Last week, we had the option of participating in "A Week With the Barefoot Contessa". There were five Ina recipes and we could choose any or all and blog about one each day during the week of Nov. 2-6. As you can see, I didn't get it done on time. And I've only made one of the five.....the squash. I plan on making two more and might actually get that accomplished today, since Mr. B is heading to Detroit to supervise the packing up of that house. Glad I don't have that job.


Anyhoo, back to the squash. Now, Ina taught me a long time ago that the only way to eat vegetables is to roast them. I've never been a veggie fan until I learned this method. I now love brussel sprouts, cauliflower, broccoli, turnips, etc., etc. Still don't like green beans, but that's not changing anytime soon!

I have to say that when I read this recipe, I was a little freaked out....6 tablespoons of butter and brown sugar? Eeeek!! Kickin healthy straight to the curb in a hurry, Ina. Since I always use only olive oil and salt and pepper I knew I wouldn't be going all in on this one but I wanted to salvage a little recipe integrity so I stuck with the olive oil, but buckled on the brown sugar and added about two tablespoons to only one squash (the recipe calls for 1/4 cup for two squash).

While I really liked the extra sweetness of the brown sugar, I don't think I'll make a habit of adding it. I just don't need the extra calories in my veggies.....I get those in plenty of other places! If I'm making this for a dinner party, sure, fatten up the guests, but just for hubs and myself, probably not!

The remaining recipes for this challenge were:

Peanut Butter and Jelly Bars - The Barefoot Contessa at Home, p. 170

Chicken Chili - The Barefoot Contessa Parties! p.232

French String Beans - Barefoot in Paris, p. 160

Roasted Potato Leek Soup - Back to Basics, p.63


I may make the Chicken Chili at some point but we've already talked about green beans, so those are out. I'm going to try to get the Leek Soup and PB&J bars done today and get those posted sometime this week.

On Wednesday, hubs and I are headed to Whistler, Canada with a couple of great friends who've FINALLY decided to tie the knot while we're there! I can't wait and will keep you posted on what I know will be a fabulous trip.

Meanwhile, here's the recipe for the squash:


Caramelized Butternut Squash
1999, The Barefoot Contessa Cookbook, All rights reserved

Ingredients:

2 medium butternut squash (4 to 5 pounds total)
6 tablespoons unsalted butter, melted
1/4 cup light brown sugar, packed
1 1/2 teaspoons kosher salt
1/2 teaspoon freshly ground black pepper

Directions:

Preheat the oven to 400 degrees F.

Cut off and discard the ends of each butternut squash. Peel the squash, cut them in half lengthwise, and remove the seeds. Cut the squash into 1 1/4 to 1 1/2-inch cubes and place them on a baking sheet. Add the melted butter, brown sugar, salt, and pepper. With clean hands, toss all the ingredients together and spread in a single layer on the baking sheet. Roast for 45 to 55 minutes, until the squash is tender and the glaze begins to caramelize. While roasting, turn the squash a few times with a spatula, to be sure it browns evenly. Taste for seasonings and serve hot.

Thursday, October 8, 2009

Barefoot Bloggers - Cheddar Corn Chowder


This week's Barefoot Blogger selection is Cheddar Corn Chowder and was chosen by....wait for it.....drumroll, please.......yes, ME, ME, ME!!! Thank you, thank you.

Can you tell that I need more to do around here?

So I chose Ina's Corn Chowder recipe. I think it's a perfect Fall soup and I've made it several times. I love the combination of the corn, potatoes, white cheddar and BACON!!! And it's one of those soups that just get better every day. Plus it freezes well. This is one of the things I used to make for Mr. B to keep in the freezer in Michigan.

This recipe makes a TON of soup, so if you're not interested in feeding an army or freezing it, I'd recommend halving it.

Here it is:

Cheddar Corn Chowder
Copyright, 1999, The Barefoot Contessa Cookbook, All rights reserved

Ingredients:

8 ounces bacon, chopped
1/4 cup good olive oil
6 cups chopped yellow onions (4 large onions)
4 tablespoons (1/2 stick) unsalted butter
1/2 cup flour
2 teaspoons kosher salt
1 teaspoon freshly ground black pepper
1/2 teaspoon ground turmeric
12 cups chicken stock
6 cups medium-diced white boiling potatoes, unpeeled (2 pounds)
10 cups corn kernels, fresh (10 ears) or frozen (3 pounds)
2 cups half-and-half
8 ounces sharp white cheddar cheese, grated


Directions:

In a large stockpot over medium-high heat, cook the bacon and olive oil until the bacon is crisp, about 5 minutes. Remove the bacon with a slotted spoon and reserve. Reduce the heat to medium, add the onions and butter to the fat, and cook for 10 minutes, until the onions are translucent.

Stir in the flour, salt, pepper, and turmeric and cook for 3 minutes. Add the chicken stock and potatoes, bring to a boil, and simmer uncovered for 15 minutes, until the potatoes are tender. If using fresh corn, cut the kernels off the cob and blanch them for 3 minutes in boiling salted water. Drain. (If using frozen corn you can skip this step.) Add the corn to the soup, then add the half-and-half and cheddar. Cook for 5 more minutes, until the cheese is melted. Season, to taste, with salt and pepper. Serve hot with a garnish of bacon.


Thanks to all of the Bloggers that cooked along with me this week. I hope you enjoyed the Chowder!!

Friday, September 4, 2009

Barefoot Bloggers - White Pizzas with Arugula

Yeah, I know this a about a week late. Get over it, things have been busy around here! I am trying to catch up, however. I still have two Cooking Italy posts to conquer and I hope to get those done sometime this weekend.

But.......these two will be here. Doesn't bode well for extra time. They're our high-falutin lawyer friends from Dallas and boy-howdie do we have a great time with them! They've helped my husband's companies out on more than one occasion so there's usually lots of business talk, which is when I politely keep my mouth shut, chug my wine and act like I know what they're talking about!! It's all good.

But my intention is to get caught up before Labor Day. There.....I put that in writing.


But on to the White Pizza. I have to admit right up front that I cheated on the dough. Why would I spend time making pizza dough when all I have to do is walk up to the pizza counter at Whole Foods and ask for a little bit of theirs? It's a little like pie crust to me! I'll make it from scratch someday.....maybe.

As you can see, I grilled these. L.o.v.e. me some grilled pizza. I don't think I'll ever buy pizza shop pizza again. Other than the fact that my kitchen looks like a cyclone went through it when I make them, grilled pizza's are perfection. I really should have taken a picture of my kitchen. I don't know what it is, but I can make a huuuuuuge mess.


These are really good. I wish I would have used a little more goat cheese and a little less mozzarella because that tangy bite of goat cheese mixed with the crispy crust and spicy arugula was pure heaven.

You must try these. You don't have to grill them....you can bake them on a pizza stone in your oven....but if you've never grilled pizza before, you really should try it. I'll bet you can do it with a lot less mess than I can!

Thanks to Andrea for the pick. Sorry I didn't get it done on time!

Here's the recipe:


White Pizzas with Arugula
Recipe courtesy Ina Garten for Food Network Magazine

Ingredients:

For the dough:
1 1/4 cups warm (100 to 110) water
2 packages dry yeast
1 tablespoon honey
Good olive oil
4 cups all-purpose flour, plus extra for kneading
Kosher salt
4 cloves garlic, sliced
5 sprigs fresh thyme
1/4 teaspoon crushed red pepper flakes

For the topping:
3 cups grated Italian fontina cheese (8 ounces)
1 1/2 cups grated fresh mozzarella cheese (7 ounces)
11 ounces creamy goat cheese, such as montrachet, crumbled
For the vinaigrette:
1/2 cup good olive oil
1/4 cup freshly squeezed lemon juice
Freshly ground black pepper
8 ounces baby arugula
1 lemon, sliced


Directions:

Mix the dough.

Combine the water, yeast, honey and 3 tablespoons of olive oil in the bowl of an electric mixer fitted with a dough hook. When the yeast is dissolved, add 3 cups of flour, then 2 teaspoons salt, and mix on medium-low speed. While mixing, add up to 1 more cup of flour, or just enough to make a soft dough. Knead the dough for about 10 minutes until smooth, sprinkling it with the flour as necessary to keep it from sticking to the bowl.

Knead by hand.

When the dough is ready, turn it out onto a floured board and knead it by hand a dozen times. It should be smooth and elastic.

Let it rise.

Place the dough in a well-oiled bowl and turn it to cover it lightly with oil. Cover the bowl with a kitchen towel and allow the dough to rise at room temperature for 30 minutes.

Make garlic oil.

Place 1/2 cup of olive oil, the garlic, thyme and red pepper flakes in a small saucepan and bring to a simmer over low heat. Cook for 10 minutes, making sure the garlic doesn't burn. Set aside.

Preheat the oven to 500 degrees. (Be sure your oven is clean!)

Portion the dough.

Dump the dough onto a board and divide it into 6 equal pieces. Place the doughs on sheet pans lined with parchment paper and cover them with a damp towel. Allow the dough to rest for 10 minutes. Use immediately, or refrigerate for up to 4 hours.

Stretch the dough.

Press and stretch each ball into an 8-inch circle and place 2 circles on each sheet pan lined with parchment paper. (If you've chilled the dough, take it out of the refrigerator approximately 30 minutes ahead to let it come to room temperature.)

Top the dough.

Brush the pizzas with the garlic oil, and sprinkle each one liberally with salt and pepper. Sprinkle the pizzas evenly with fontina, mozzarella and goat cheese. Drizzle each pizza with 1 tablespoon more of the garlic oil and bake for 10 to 15 minutes, until the crusts are crisp and the cheeses begin to brown.

Make the vinaigrette.

Meanwhile, whisk together 1/2 cup of olive oil, the lemon juice, 1 teaspoon salt and 1/2 teaspoon pepper.

Add the greens.

When the pizzas are done, place the arugula in a large bowl and toss with just enough lemon vinaigrette to moisten. Place a large bunch of arugula on each pizza and a slice of lemon and serve immediately.

TIP Make sure the bowl is warm before you put the water and yeast in; the water must be warm for the yeast to develop.

TIP Salt inhibits the growth of yeast; add half the flour, then the salt, and then the rest of the flour.

TIP To make sure yeast is still "alive," or active, put it in water and allow it to sit for a few minutes. If it becomes creamy or foamy, it's active.