Friday, July 31, 2009

Renovations.....and finally making some decisions

I'm a procrastinator. Let's just get that out of the way. Especially if I know something is not going to be pleasant. I'll put difficult shit off forevah.....gynocologist appts, DMV visits, cleaning my closet, etc. I can't be alone here. On the flip side, when I want something, I want it NOW.

Well for a couple of years, Mr. B and I have wanted to build a "pool house" out by our pool. Our house sits up on top of a crest in Birmingham with fabulous views of the city and surrounding suburbs. We built the house on two lots and because there was so much rock to deal with, we chose to put the swimming pool next to the house instead of behind it. It saved a lot of money in excavation work (no dynamite blasting is permitted) and also provided tremendous views from the pool. In the past seven years we've been both happy it's beside the house because of the views and the breeze we get there and disapointed because of the inconvenience of not being close to all of the amenities of the house, i.e., kitchen, bathroom, etc.

So a couple of years ago we decided to bite the bullet and build a structure that would allow us to really enjoy being out there but I've been putting off getting it done. Didn't want to deal with it and wasn't exactly sure what we wanted. We did know we wanted a couple of things.

1. Someplace to get out of the sun. Alabama is H.O.T. and even though you're at the pool and want some sun, there also needed to be a place to retreat and get out of the heat but still enjoy being poolside.

2. A kitchen. It's too far away from the house to enjoy eating out there. All of that transporting of food and utensils really is a buzzkill. Plus, it was just plain too hot. (Refer to problem #1!)

3. The ability to make full use of the beautiful views. In the past seven years, the "hillside junk" as I call it has grown to a point that it's starting to impede the views. I want it GONE!

So I finally got around to hiring an architect and today he presented me with some kick-ass plans!


Here is a view from the far end of the pool looking back at the house. This picture was taken about a year after we moved in and the landscaping is much more mature now, but it gives you an idea of what we're talking about. The landscaping between the upper garage and the pool will be removed to make room for the pool house.
(click on any of the pictures to enlarge)


This is the current view coming out the back door into the walkway leading to the pool. The garage is the wall to the right.

This is the view from the garage. The pool is on the other side of that hedge. Everything except the large tree on the far left will be gone.


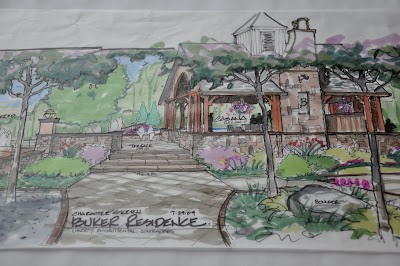
This is the proposed view coming from the back of the house. Nice, eh!! It still gives the pool plenty of privacy but takes care of all of our issues.

This is the driveway leading to the upper garage with the pool to your right. Once again, that entire hedgerow and fence will be removed.

This will be the new view coming up the driveway.


This is the view we are trying to take advantage of. After that hedge/fence row is a huge dropoff. We're going to clear out that area and install an infinity edge hot tub which should be a beautiful place to enjoy a glass of wine (or two!)


That area right there will all be gone!

This is the "bird's eye view" Initially the architect wanted to remove one of Mr. B's upper garage bays. He said that he thought since we didn't have any children that we couldn't possibly need seven garage bays. Ummm....not so fast Mr. Architect. Don't mess with Mr. B's garages. It's the only area of the house that he gets to decorate and call his own! Man loves him some cars and motorcycle and that's where I send him when I need some alone time!

So we'll be keeping all of the existing garage space. Mr. Architect will have to re-think that area!


Anyway, I'm really excited about this. I'm done procrastinating and now I want this finished! Yesterday.

I'll keep you posted.


Thursday, July 30, 2009

CEiMB - Baked Onion Rings

I know this is actually last week's Craving Ellie in My Belly asignment. I got so wrapped up in baby shower preparations last week that I never got to make these onion rings. I could have just skipped it and made this week's Cobb Salad, but I really wanted to try these.


Other than being a tad dry, I really liked these. Nice and crispy on the outside with a perfectly cooked sweet onion in the middle.

I substituted panko breadcrumbs for the called for crushed up potato chips. I also used a tablespoon of southwestern seasoning mix and a teaspoon of ground chipotle to season the panko.


I'd definitely make these again.

Here's the recipe.

Oven Baked Onion Rings
Healthy Appetite with Ellie Krieger

Ingredients:

Cooking spray
4 cups baked potato chips (I used panko breadcrumbs)
1/2 teaspoon cayenne (I used a combination of southwestern seasoning mix and ground chipotle pepper)
1 cup lowfat buttermilk
1/2 cup plus 2 tablespoons all-purpose flour
1/2 teaspoon salt
1/4 teaspoon fresh ground black pepper
1 to 2 large Vidalia onions, peeled


Directions:

Preheat the oven to 450 degrees F.

Spray a baking sheet slightly with oil and set aside. (I skipped this step and instead used a baking sheet lined with a silpat) Place potato chips in the bowl of a food processor and process into crumbs, about 20 seconds. (Since I used panko, I skipped this step.) Transfer to a shallow bowl, add cayenne, and set aside. In another bowl, combine buttermilk, 2 tablespoons of flour, salt and pepper and set aside. Slice onions into 1/2-inch circles and separate into rings, keeping only large, whole rings (reserve rest of onions for other uses). You should come out with about 12 to 14 rings.

Place the remaining flour in a sealable plastic bag, then add onions, and shake to coat. Dip onions 1 at a time into the buttermilk mixture, then dip into potato chip crumbs and place on baking sheet. Spray canola oil evenly over rings (I did not do this) and bake for 20 minutes, or until coating is crisp. Season with salt, to taste, and serve immediately.


A lot of the members said they had trouble with the coating coming off the onions during the baking process and suggested putting the coated rings into the refrigerator for about 10 minutes before baking. I did not do this and the coating stuck to the onions beautifully, so it may have had something to do with the potato chips, I don't know.

Wednesday, July 29, 2009

TWD - Vanilla Ice Cream

I have worn out the ice cream maker this summer......strawberry sorbato, honey peach, just plain peach, and several others. So when Lynn of Cafe Lynnylu picked Dorie's Vanilla I was excited.


There were plenty of "playing around" options for this recipe but I really wanted to keep this simple. Vanilla ice cream is the perfect accompaniment to soooo many things and I wanted to see if this beat out my favorite store version.

It did.

This is a custard based ice cream which seems to intimidate some people. Other than taking a bit more time, custard doesn't freak me out. Yeast....now that's another story for another day, but custard and I are cool with each other.

Dorie calls for either soaking a scraped vanilla bean in the warm milk/cream mixture for 30 minutes or adding pure vanilla extract later. I had vanilla paste in the pantry that I've always wanted to try so that's what I used. I wasn't sure whether to add it at the end like the vanilla extract or let it sit in the warm milk, so I compromised and added it to the warm milk and just letting it sit for 15 minutes. It worked that way but probably would have worked the other way, too.

I served this to Miss Charlotte with some crushed oreos on top. She said it was fantastic. I still have a lot left along with some oreos that need to be GONE before I start eating them, so I think I'm going to put the rest into an ice cream pie with an oreo crust of some kind. I'll let you know.

Friday, July 24, 2009

Cute!!!

I'm hope I never have to get married again, but if I do, this is how I'm rollin!


Thursday, July 23, 2009

Barefoot Bloggers - Peach (Blackberry) and Blueberry Cobbler


As a Southerner I'm embarrassed that I left the peaches out.  But I need to explain.

OK, so if you're one of the twelve people that read this blog, you'll know that I've posted thousands (ok...maybe five) peach recipes over the last month or so.  See, the thing is, peaches start arriving in Alabama the first of June.  That really excites me every year and I tend to make peach everrryyyything the entire month.


But then by the first part of July, I'm burned out on peaches.  So when I found out at the end of June that Aggie of Aggie's Kitchen picked this recipe I was initially really excited.  By the time July 23rd came around....not so much.


I was o.v.e.r. peaches.   BUT, when I went out shopping this morning for the fruit for this assignment, my intention was to suck it up and get peaches.  Trouble is when I walked into Fresh Market, the "fruit guy" (ok, maybe not what he wants to be called) was putting out these beeeeeeutiful blackberries.  Not the first time I've seen some really gorgeous blackberries this season, I just didn't have a purpose for them.


Not the case this time.  I made an executive decision right there next to the "fruit guy" in Fresh Market to substitute blackberries for peaches.

GREAT decision.  I'm just sayin.

First of all, this is just a great basic Ina recipe.  I think you could sub just about any "in season" fruit and this will be a winner.  Plus, it can be thrown together in about 10 minutes (other than baking time).  

This will definitely be one I come back to again.  It's just too good.

Here's the recipe:


Peach & Blueberry Crumbles
Barefoot Contessa at Home 


For the fruit:

2 lbs firm, ripe peaches (6-8 peaches)
2 tsp grated lemon zest
2 tbsp freshly squeezed lemon juice
1/2 cup granulated sugar
1/4 cup all-purpose flour
1 cup fresh blueberries (1/2 pint)


For the Crumble:

1 cup all-purpose flour
1/2 cup granulated sugar
1/4 cup light brown sugar, lightly packed
1/2 tsp kosher salt
1/4 tsp ground cinnamon
1/4 lb (1 stick) cold unsalted butter, diced

Preheat the oven to 350 degrees.

Immerse the peaches in boiling water for 30 seconds to 1 minute, until their skins peel off easily. Place them immediately in cold water. Peel the peaches, slice them into thick wedges, and place them in a large bowl. Add the lemon zest, lemon juice, granulated sugar, and flour. Toss well. Gently mix in the blueberries. Allow the mixture to sit for 5 minutes. Spoon the mixture into ramekins or custard cups.

For the topping, combine the flour, granulated sugar, brown sugar, salt, cinnamon, and the butter in the bowl of an electric mixer fitted with a paddle attachment. Mix on low speed until the butter is the size of peas. Rub the mixture with your fingertips until it’s in big crumbles, then sprinkle evenly over the fruit. Place the ramekins on a sheet pan lined with parchment paper and back for 40 to 45 minutes, until the tops are browned and crisp and the juices are bubbly. Serve warm or at room temperature. If you want to make these early, store the unbaked crumbles int he refrigerator and bake before dinner. Serves 5 to 6.

For the CEiMB readers....my intention is to post the Baked Onion Ring recipe tomorrow...check back then.

Wednesday, July 22, 2009

Buzzards

Look at that face.  The steely determination in those eyes.  Well, that one eye.  The eyebrow on the right always hangs over so I can't see that right eye.  But that left eye tells you all you need to know.  Doesn't it just scream fierce?  

Not exactly.  It may look fierce to the untrained, but in truth it screams "frustrated buzzard hunter".


We have buzzards outside our house.  Lots of them.  (My Audubon-esque husband tried to convince me they were hawks when we first moved here, but when twelve of them showed up one day, he had to admit he might have been wrong).


And because our house sits on top of a mountain (I use the term loosely.  It is Alabama) the buzzards fly at just the right height that Rafter can watch them....and think he can catch them.


On sunny days (can't figure out where they go on cloudy days??) they circle for hours.  Swooping down right in front of the windows just to torment him.


He runs from one end of the house to the other.  Watching.  Growling.  Barking.


Frustrated.

Tuesday, July 21, 2009

TWD - Raspberry Blanc-Manger (Blah-mahn-jhay)

It is better to have tried and failed than to not have tried at all.  Or something like that, right?

Don't let that pretty picture fool you, people.  I'm a failure.


So, last week I didn't even try the assignment and this week mangled the manger.  Which is the bigger evil?

This beast would not set up.  I followed the directions.  I think.  I'm not totally sure.  I may or may not have screwed up the gelatin.  It called for 1/4 ounce.  I had one box containing four packets of gelatin.  The box said it contained a total weight of 1 ounce.  In my mind that meant that each packet was 1/4 ounce.  So I dumped in a whole packet and added the three tablespoons of water and let it sit for two minutes.  Then I had this big glob that didn't look right, so I re-read the package.  It said that a serving was 1/4 ounce and that the package contained 16 servings.  Ruh-roh.  So I re-did that step and just added 1/4 of one of the packets.  It looked better so I thought I was fine and finished the recipe.

Waited four hours and unmolded it.  It was the consistency of whipped cream.  That's not right, right??

I put it back into the fridge and waited until the next morning.  Still runny.  Damn. 


I did taste it, however.  The flavor was fine, but I didn't like the texture at all.  I must not have ground my almonds fine enough because it was really grainy.  So, it seems that I found more than one way to ruin a blanc-manger.  Fabulous.

For a much better representation, be sure to check out the other TWD bakers.  The much more talented TWD bakers.  Not me.

Thanks to Susan of Sticky, Gooey, Creamy, Chewy for this week's pick.  Head over to her site to see a beautiful Blanc-Manger.

And if you have any suggestions for me, please share them.  I'd love to know what I did wrong.  I'd really like to try this again.

Saturday, July 18, 2009

Lucky guy

Mr. B ate really well today if I do say so myself.

I may tell you about it later this week.  If you're nice.

Friday, July 17, 2009

Random

Five things I'm really happy about this week!


1.  49 days until kickoff!!!  My Buckeyes kick off at noon on Saturday, Sept 5 at home vs. Navy.  That's just 7 weeks from today.  Or 1176 hours.  70560 minutes.  Start counting down.

2.  This Washingon Post article about the most hideous shoe every made.


As the economy boomed, Crocs became a huge seller. But now cash-strapped consumers have decided they don't need a second pair.


3.  Word Games.  I'm addicted.  It started when I downloaded Bookworm, then I found Pathwords on Facebook and THEN I downloaded Word Warp on my iPhone.  Yes, there is an app for that!  I think there's an app for just about any addiction you may have.  

4.  Set your DVR's people.  The season premiers of Food Network's Barefoot Contessa (Saturday, 1:30pm EST), Ace of Cakes (Sunday, 10:00pm EST) are both this weekend.  

5.  You must make this.  It has to be the world's easiest appetizer.  I've made this three times for three different dinners and everyone has loved it.  It's another great recipe from Bottega Favorita.


Baked Feta 
adapted from Bottega Favorita by Frank Stitt

2 cups Marinara sauce (either make your own or just use your favorite jarred Marinara.  Mine happens to be Rao's Arrabiata Sauce)
1 cup crumbled Feta (I prefer the kind that's still in the block form and I crumble myself)
1 tablespoon olive oil
Pinch of cayenne if desired
A few basil leaves

Preheat the oven to 450 degrees.

Spoon the marinara into a medium gratin dish (approximately 8 inches long) or divide it among four individual gratin dishes or ramekins.  Scatter the cheese over the center.

Bake until the sauce is bubbling hot.  8 to 10 minutes.

Sprinkle with the cayenne and tear the basil leaves on top.

I've served this with focaccia, baked pita slices, and sliced baguette slices that I've baked and rubbed with garlic.  All work great.  Pick your favorite

Thursday, July 16, 2009

Slacker

My name is Jill and I am a TWD and CEiMB slacker.

I know you've probably come her looking for a Plum Tart on Tuesday or some Aromatic Noodles with Lime Peanut Sauce today.  (Or your browser made a dangerously wrong turn somewhere and you're looking at this wondering WTH happened and how do I get out of here?)

I'd like to be able to tell you that I've been doing something important like grilling Sonia Sotomayer or relieving stress with my fellow SSA workers in Arizona, but I've just been doing really fun stuff like planning a baby shower for this little peanut.


Plus, I'm sorry to say that neither of this weeks recipes sparked anything in me so you'll have to go elsewhere if you're dying to know about the tart and the noodles.

I will give you some links for an other-worldly dessert I made this weekend.  I've long extolled the brilliance that comes from my fellow food bloggers and this week I offer proof.  Unfortunately I don't have any pictures of my finished product.  I served it up to my guests and by the time I went to get the camera everyone was licking their bowl.  No respect.

It all started when I saw this recipe for Bananas 'n' Cream Bundt Cake on the Taste of Home website.  I'm always looking for ways to use the last few bananas that are always left over at the end of the week and knew I'd be making it at some point.

THEN.....last week, Our Best Bites published this masterpiece.....Caramelized Banana Ice Cream (which didn't require a custard....HOLLA!) that also included a recipe for Buttermilk Caramel Sauce.  Are you kidding me?  If nothing else, make the caramel sauce and eat it straight from the pan.   You'll thank me. 

All this put together may sound like banana overload (not that there's anything wrong with that) but it was f.a.b.u.l.o.u.s.   I'm planning on making this again this weekend to take to a friends house.  He's offered to make us his famous grilled chicken and I'm bringing dessert.  I'll try to get some pictures then.

So apologies are in order to the TWD and CEiMB gang....I'll be back next week....but you'll forgive me if you make this dessert!

Saturday, July 11, 2009

Peach and Raspberry Crisp with Peach Ice Cream

A couple of weeks ago, I had peaches coming out of my....you know what.  I made so much peach shizzle that I haven't bought any peaches since.  (I'm starting to get a hankering again, however)

I made everything from Peach Bread to Peach Stoli's (which I'll post later), but Mr. B's favorite is always Ina's Peach and Raspberry Crisp.  As usual, this makes a ton, so invite your friends and family over (and if they bring their new puppy, you won't have to do the dishes!)


I also made some of David Lebovitz's Peach Ice Cream.  I wanted to do a comparison between his and Dorie's Honey Peach Ice Cream.  While I liked the fact that David's didn't require me to make a custard, Dorie won the taste test, hands down.


This is the perfect summer dessert.  Buck certainly thought so.  You just can't let a puppy out of your sight!


Here are the recipes:

Peach and Raspberry Crisp
The Barefoot Contessa Cookbook

Ingredients:

4 to 5 pounds firm, ripe peaches (about 10-12 large peaches)
Zest of 1 orange
1 1/4 cups granulated sugar
1 cup light brown sugar, packed
1 1/2 cups plus 2 to 3 tablespoons all-purpose flour
1/2 pint raspberries
1/4 teaspoon salt
1 cup quick-coking oatmeal
1/2 pound cold unsalted butter, diced

Preheat the oven to 350 degrees.  Butter the inside of 10 x 15 x 2 1/2 inch oval dish.

Immerse the peaches in boiling water for 30 seconds, then place them in cold water.  (I never do this.  The peaches are always ripe enough that the peels just pull off.)  Peel the peaches and slice them into thick wedges and place them into a large bowl.  Add the orange zest, 1/4 cup granulated sugar, 1/2 cup brown sugar and 2 tablespoons of the flour.  Toss well.  Gently mix in the raspberries.  Allow the mixture to sit for 5 minutes.  If there is a lot of liquid, add 1 more tablespoon of flour.  Pour the peaches into the baking dish and gently smooth the top.

Combine 1 1/2 cups flour, 1 cup granulated sugar, 1/2 cup brown sugar, salt, oatmeal, and the cold, diced butter in the bowl of an electric mixer fitted with a paddle attachment.  Mix on low speed until the butter is pea-sized and the mixture is crumbly.  Sprinkle evenly on top of the peaches and raspberries.  (At the point I also sprinkle about two cups of The Fresh Market's French Vanilla Granola on top for a little extra crisp, but it's totally not necessary.)  Bake for 1 hour, until the top is browned and crisp and the juices are bubbly.  Serve immediately or store in the refrigerator and reheat in a 350 degree oven for 20-30 minutes, until warm.


Peach Ice Cream
The Perfect Scoop by David Lebovitz

Makes about 1 quart

Ingredients:

1 1/3 lb ripe peaches (about 4 large peaches)
1/2 cup water
1/4 cup sugar
1/2 cup sour cream
1/4 teaspoon vanilla extract
A few drops freshly squeezed lemon juice

Peel the peaches, slice them in half, remove the pits.  Cut the peaches into chunks and cook them with the water in a medium, nonreactive saucepan over medium heat, covered, stirring once or twice until soft and cooked through, about 10 minutes.

Remove from the heat, stir in the sugar, then cool to room temperature.

Puree the cooked peaches and any liquid in a blender or food processor with the sour cream, heavy cream, vanilla, and lemon juice until almost smooth but slightly chunky.

Chill the mixture thoroughly in the refrigerator, then freeze it in your ice cream maker according to the manufacturer's instructions.

Friday, July 10, 2009

Barefoot Bloggers - Pasta with Sun-Dried Tomatoes

I can't believe that I haven't made this before now.  Mr. B's favorite dinner is pasta tossed very simply with fresh tomatoes, basil and mozzarella with just a little olive oil and salt and pepper.

This Ina recipe takes that basic concept and kicks it up a notch (mixing my chefs).  The only problem is that I love sun-dried tomatoes and hate olives and Mr B. loves olives and hates sun-dried tomatoes!  He wasn't here when I made this, so the olives lost out.


This has a nice dressing that gets a little kick from the capers and red wine vinegar.  I might try substituting some balsamic next time.  Maybe.

I tried this when the pasta was still a little warm and I have to say that this tasted better right out of the fridge.  Cold.  So this might be a nice picnic salad.

Thanks to Delta Whiskey for this week's pick.  It was a great one.

Here's the recipe:

Pasta with Sun-Dried Tomatoes
Copyright, 2002, Barefoot Contessa Family Style, All Rights Reserved


Ingredients

1/2 pound fusilli (spirals) pasta
Kosher salt
Olive oil
1 pound ripe tomatoes, medium-diced
3/4 cup good black olives, such as kalamata, pitted and diced
1 pound fresh mozzarella, medium-diced
6 sun-dried tomatoes in oil, drained and chopped

For the dressing:
5 sun-dried tomatoes in oil, drained
2 tablespoons red wine vinegar
6 tablespoons good olive oil
1 garlic clove, diced
1 teaspoon capers, drained
2 teaspoons kosher salt
3/4 teaspoon freshly ground black pepper
1 cup freshly grated Parmesan
1 cup packed basil leaves, julienned


Directions

Cook the pasta in a large pot of boiling salted water with a splash of oil to keep it from sticking together. Boil for 12 minutes, or according to the directions on the package. Drain well and allow to cool. Place the pasta in a bowl and add the tomatoes, olives, mozzarella, and chopped sun-dried tomatoes.

For the dressing, combine the sun-dried tomatoes, vinegar, olive oil, garlic, capers, salt, and pepper in a food processor until almost smooth.

Pour the dressing over the pasta, sprinkle with the Parmesan and basil, and toss well.

Thursday, July 9, 2009

CEiMB - Lobster Rolls

This week's Craving Ellie in My Belly was chosen by MacDuff of Lonely Sidecar.  This is one of my favorite blogs mainly because she always makes me laugh out loud.  She's from Boston, so I wasn't surprised at her choice of Ellie's Lobster Rolls.  No better place to get lobster than the Northeast coast.


Since I was home by myself, I tried to scale the recipe down to just a sandwich.  I didn't quite get the proportions right, because it was a little "saucy" for my taste.  I liked the taste, but would have preferred a little less sauce.

I made a few substitutions including eliminating the mayonnaise and using horseradish mustard instead.  I'd definitely do that again.  It added just the right amount of spice.  I couldn't find any whole wheat hot dog buns, so I just toasted some regular hoagie rolls.

Here's the recipe:


Lobster Roll
2008, Ellie Krieger, All rights reserved
Show: Healthy Appetite with Ellie Krieger Episode: Treat Yourself Good

Ingredients

1/2 cup nonfat plain Greek-style yogurt or 2/3 cup regular, plain nonfat yogurt
3 tablespoons mayonnaise (I substituted horseradish mustard)
1 stalk celery, finely chopped
1 tablespoon chopped scallion greens (about 1 scallion) (didn't have any so didn't use)
1 tablespoon fresh lemon juice
1 pound cooked lobster meat or cooked shrimp, cut into 1/3-inch pieces (about 2 1/2 cups)
Salt and freshly ground black pepper
4 whole-wheat hot dog buns
1 tablespoon extra-virgin olive oil

Directions

If using regular yogurt, place it in a strainer lined with paper towel and set the strainer over a bowl. Let the yogurt drain and thicken for 20 minutes.

In a bowl, stir together the thickened or Greek-style yogurt, mayonnaise, celery, scallion and lemon juice. Fold in the lobster meat and season, to taste, with salt and pepper. Chill until ready to use. Just before serving, open the hot dog buns and brush the inside with olive oil. Heat a grill pan over moderately high heat and grill the bread, cut side down, until toasted, about 3 minutes. Fill each with 3/4 cup of the lobster mixture and serve immediately.

Per Serving:

Calories 340; Total Fat 14 g; (Sat Fat 2g, Mono Fat 5 g, Poly Fat 6 g) ; Protein 29 g; Carb 25 g; Fiber 3 g; Cholesterol 85 mg; Sodium 720 mg

++++++++++++++++++++++++++++++++++++++++++++++++++++++

On a side note, I'd like to congratulate my dear friends Jill and Melvin on the arrival of their son, Bram.   Isn't he beautiful?


These guys have waited a long time to be parents and I couldn't be happier for them.  No one deserves it more.

Plus, I can't wait to spoil him!


Tuesday, July 7, 2009

TWD - Tribute to Katherine Hepburn Brownies

So, I guess Katherine Hepburn made a mean brownie.  Who knew?  

The story goes that a one Ms. Heather Henderson of St. Paul, Minnesota wanted to quit her studies at Bryn Mawr.  Her father managed to get Miss Hepburn, a Bryn Mawr alum and a neighbor, to intervene.  The famous Kate invited both the young woman and her father to her home one afternoon.  At tea, Ms. Henderson got a taste of the legendary brownies as well as of the acctress's view on education.

In her tribute to the actress, Ms. Henderson wrote, "I'll always be grateful to Miss Hepburn for making me stick it out at Bryn Mawr and for giving me these rules to live by:  1.  Never quit; 2.  Be yourself; and 3.  Don't put too much flour in your brownies."

So it seems there are quite a few renditions of this brownie recipe floating around the universe, but this is Dorie's interpretation.


I've got to say....it's a damn good rendition.  These are A.M.A.Z.I.N.G.  Sorry, Ina, but they're better than yours.  And the recipe actually makes a normal amount....not enough for a small army.  Still love you, Ina.

These are so good, that after tasting a bite, I took my pictures and called my friend Jenny to come get these suckers out of my house.  She's got a house full of testosterone filled boys who don't have to worry about the size of their ass.


I am planning on making another batch of these this weekend for Mr. B.  He's not worried about his ass size either cuz it's perfect!  ;)

The recipe says that these are a gooey brownie and after reading what the other bakers were saying I decided to bake these five minutes longer than directed.  I'm glad I did.  They were still nice and fudgy in the middle but cooked all the way through.

Check out Lisa's blog, Surviving Oz, for the recipe.  Lisa's not an official TWD baker but she designed our new logo, below, so she had the pleasure of picking this weeks recipe and she baked along with us.  Thanks, Lisa, for a fabulous new logo and a delicious pick.


Saturday, July 4, 2009

CEiMB - Breakfast Cookies

Sorry for being so late on this post.  I'm in Hilton Head, SC for the wedding of these two....Nate and Erica....and have been all wrapped up in the pre-wedding festivities.  The actual wedding is this afternoon, but we've all been doing our share of pre-gaming, so to speak!


I made these cookies the day before we left and have been eating them ever since.  I love them.  My only complaint is that they didn't hold together very well.  I'm not sure if it's the original recipe's fault or my substitutions??

Doesn't matter...even all broken up, they're delish.


Here's the recipe:


Breakfast Cookies
2007 Ellie Krieger

Serves:
12 cookies, serving size 1 cookie


Ingredients

3/4 cup whole-wheat pastry flour
1/2 cup all-purpose flour  (I used all whole-wheat pastry flour)
1/2 teaspoon baking soda
1 teaspoon ground cinnamon
1/2 teaspoon ground nutmeg
1/4 teaspoon salt
2 tablespoons unsalted butter
1/4 cup canola oil
1/4 cup dark brown sugar
3 tablespoons granulated sugar (I substituted Agave nectar)
1 egg
1/4 cup (1 small jar) strained carrot baby food (I used 1/4 cup non-fat yogurt)
1 teaspoon vanilla extract
1/2 cup rolled oats
1/2 cup bran cereal flakes (I used all oats)
1/3 cup raisins (substituted dried cranberries)
1/3 cup walnut pieces, lightly toasted in a dry skillet for 2 minutes, until fragrant and chopped (I eliminated the nuts)

Directions

Place rack in center of oven and preheat oven to 350 degrees F.
Whisk together flours, baking soda, cinnamon, nutmeg and salt in a medium-sized bowl. Combine butter, oil and sugars in the bowl of a stand mixer and mix on high speed, scraping down sides if necessary, until sugars have dissolved and mixture is light in color, about 1 minute. Add egg, carrot puree and vanilla and beat an additional 30 seconds. Add flour mixture and beat an additional 30 seconds. Add oats, flakes, raisins and walnuts and mix over low speed just until incorporated. Dough will be slightly sticky and less cohesive than traditional cookie dough. Line a large cookie sheet with parchment paper. Using between 3 to 4 tablespoons of batter, form a ball and place on cookie sheet. Repeat with remaining batter, leaving about 3 inches between cookies. Wet hands and use palm of hand to flatten cookies until about 1/4-inch thick. Bake for 12 minutes, until cookies are fragrant but still soft. Let cookies cool slightly, then transfer to a wire rack to cool completely.


I'll absolutely be making these again.  A relatively healthy breakfast on the go option.

Happy Fourth of July everyone.  I'll be watching two great kids tie the knot this afternoon, then some reception dancing, then Hilton Head's famous fireworks.  Y'all be safe!